
How To Make Large Acrylic Paintings: From Raw Materials To Final Clearcoats

This is an in-depth tutorial demonstrates one approach to building panels and how to go about painting an acrylic painting on them. This includes the entire process with pictures; what materials to purchase, prices, tools to use, step by step construction, AND the painting process including subject matter, design, undercoating, drawing, blocking in, refining, and finishing touches.

Do you ever volunteer time, donate artwork, or create custom art for less than you normally charge because it’s for a good cause? I happily do this when my schedule and finances allow. It feels good, the world needs it, and as an artist it gets your name out there. Recently a company hired me to create 2 triptychs for some assisted living housing they were helping bring art into. This blog documents the creation of those two pieces from start to finish.
Each triptych is roughly 3’x8’, with the individual panels being 36” x 30”. While building the panels it occurred to me that this process might be fun for both collectors and artists to see. So, I documented the building and painting of the panels. It’s quite a bit of work, but I consider it a labor of love. By no means is this the ultimate foolproof guide – this is how I did it on one occasion. Use what helps you and don’t worry about the rest - and post questions if you have them! Let’s start with a rough outline and then go into detail.
Panel Construction Outline:
- Decide size of panels, calculate required materials and purchase
- Cut materials down to size
- Assemble mitered edging and attach to Masonite
- Attach wire hanging hardware to the back
- Fill Nail holes and sand, wipe clean
- Apply 3 Primer Coatings: Oil Primer, GAC 100 Barrier, Acrylic Primer
Painting Process Outline:
- Determine Subject
- Planning: Simplify into 3 Values, Warm and Cool Colors
- Apply Undercoating
- Sketch & Block in Large Shapes
- Darks
- Lights
- Refine
- Finish: Safety Isolation Coating & Removable Varnish Coating

All Righty - let's get this going - below are the details for the entire process, start to finish.

Panel Construction Details:
-
Decide size of panels, calculate required materials and purchase (4 Hours)
A triptych is a painting that is divided into 3 panels; in this case the “tri” prefix denotes 3. A diptych is 2 panels and a polyptych refers to 4 or more panels. For this project we needed 2 triptychs; each consisting of 3 panels measuring 30” wide and 36” high. The edge /frame of the panel needed to be approximately 1” deep. I decided on 1/8” Masonite hardboard for the surface and 1x4 cedar for the edges. Masonite is easy to cut, incredibly smooth, and cheap. Cedar is easy to cut and lightweight, but not particularly cheap. I’m using Home Depot for this project because they will cut Masonite to the size you need with acceptable accuracy. Masonite comes in 4’x8’ (48” x 96”) sheets for around $10. We need 2 sheets, since we can get (3) 36x30 panels from each sheet.
For edging boards, 1”x4”x8’ rough sawn cedar costs about $5 for each board. Each board can be ripped on a table saw into (4) 1”x1” strips. As a result of the 4 rips, an 8’ board will then make 32 lineal feet. Each panel needs (2) 36” lengths and (2) 30” lengths. Multiply that times 6 panels and we need (12) of each length. From each 8’ strip we can get (2) 36” cuts and (1) 30” cut. With straight 90 degree cuts this would be a bit too tight, but we are mitering the cuts, so we gain a half inch every time the strip is cut. The last 2 strips will be used for the remaining (6) 30” lengths needed. In total we need 8 strips, or 64 lineal feet, or two 8 foot boards. I will buy 3 just in case there are knots or other imperfections that cause the strips to break into un-usable lengths.
Here is the shopping and cost list for the project, expendable supplies have a cost
(2) 4’x8’ Masonite Sheets cut to (6) panels measuring 36”x30”
$20
(3) 1”x4”x8’ Cedar Boards
$15
1 Gallon Kills Oil Primer, Interior/Exterior, 1 hour dry to touch
$20
Rubber coated orange gloves
$5
(1000) 3/4” 18 gauge brad Nails
$4
Plastic Wood
$9
1 Gallon Golden Acrylic Gesso
$60
1 Gallon Golden GAC 100 Acrylic Polymer
$60
1 Gallon Golden Soft Gel Gloss Medium
$60
1 Gallon Golden ULVS Satin Acrylic Polymer Varnish
$85
Golden Fluid Acrylics
$30
Golden Heavy Body Acrylics
$75
3M 220 grit sandpaper
$25
Titebond Wood Glue
$5
Brushes for Priming
$20
Spray bottle with water
Clean rags/ towels
Particulate Respirator & VOC Mask
$75
2” putty knife
Mitre Saw
Table Saw
Cordless Drill, Philips screwdriver
1/8” drillbit
35lb strength picture wire
$5
Various clamps
Total
$573
-
Cut Materials To Length (3 hours)
As mentioned earlier, Home Depot will cut the Masonite to size for free. This is a huge help. I have a Suburban where I can fit the 4x8’ sheets in back, but they are awkward to carry, handle, and cut, so have the store do that if you can.
For the Cedar, first step is to rip each board into 1”x1”x8’ strips on the table saw. Then, using a miter saw each strip can be cut into appropriate lengths with 45 degree cuts – making sure cuts are never parallel.

Measurements are made “Outside to Outside”, meaning you measure from the side of the cut that is longest, or “outside”. Putting the pieces back to back will ensure they are the exact same length.

At this point I ran all of the cut strips over a bench sander to get rid of any rough wood that might cause slivers.


-
Assemble mitered edging and attach to Masonite (3 hours)
Using wood glue, dab a dime sized blob on the cut angle of one 36” and one 30” strip. Join them in a 90 degree clamp, and press 2 v-nails into the miter to join them permanently. First assemble all corners/halves. When the glue dries (2-4 hours), it is safe to assemble two halves together.


When connecting two halves, it can be helpful to clamp the opposite corners together so they don’t flop around and weaken any joints.

Using an 18 Gauge Pneumatic nailer loaded with ¾” brad nails.
Secure the Masonite panels to each completed frame. Start by placing a bead of wood glue on top of the cedar frame, and then put the Masonite (rough side down) over the cedar frame.
Line up one corner so the Masonite is flush with the cedar edge, and then tack a nail within ½” of the corner. Move down one edge to another corner, making sure the edge is still flush, tack a nail in that next corner. Move to the final two corners, adjusting the frame as needed to keep the Masonite as flush as possible with the frame. Then proceed to nail out the panel every 2-4 inches along all 4 edges.
-
Fill Nail holes, sand; wipe clean (2 hours)
Flip the panels back over so the smooth side is up. Using a putty knife, scrape all nail holes so the surface is smooth.

Fill nail holes, corners, and any other surface imperfections with plastic wood or wood filler.

Let dry (2-4 hours) and then sand smooth with 220 grit sandpaper.
I also sand the edges with a belt sander to ensure everything is flush.
Spray a clean cloth with water so it is damp; gently wipe all dust off of panels to prepare for primer coats.
-
Apply 3 Primer Coatings: Oil Primer, GAC 100 Barrier, Acrylic Primer (3 hours)
Wear a respirator and rubber gloves.
Place the panel smooth side down on a flat table top. Pour about a 12” pool of oil primer onto back of panel. Using a 4” house painting brush, work the primer in until the entire back is covered evenly, also prime the inside and back edges of the frame. I like to oil prime the back of the panel so that moisture does not wick through the back of the panel over the years, inevitably causing warping or distortion.
On an adjacent flat table top, place two 2”x4”x18” blocks about 2’ apart. Flip your panel over and place on top of blacks. These will prop the panels up so you can prime the front of panel and side edge of framing without having drips on the frame or getting the backside stuck to the table. Pour a much smaller pool (6”) of oil primer on the front side of the panel and brush out surface and side edge; making sure drips don’t collect on bottom outside corner. This side is smooth so it does not require nearly as much primer. It’s important to have a uniform coating, and take care to apply a thin coating so it dries thoroughly. Let dry for 24 hours, lightly sand and wipe down.
Using a clean brush each time, repeat the process first with GAC 100, and finally with Golden Acrylic Gesso. Make sure to alternate the direction of your brushstrokes with each coat.
-
Attach wire hanging hardware to the back (2 hours)
Flip the panel over, and make a pencil mark 1/3 of the way down both sides, and also make a mark at the midpoint of the top edge.
From that midpoint, measure straight down 3”. This is the point the wire will ultimately stretch upward to.
I used two wire hangers and 35lb framing wire. I measure the wire out before cutting it, usually extending it about 1.5 times longer than the width of the painting. This allows room for the wire to stretch upward to the pencil mark at 3” from the top of the painting, and also extra length to loop the wire through hangers and twist with a drill. Cut the wire. Loop one end through a hanger about 6” and then twist tightly.
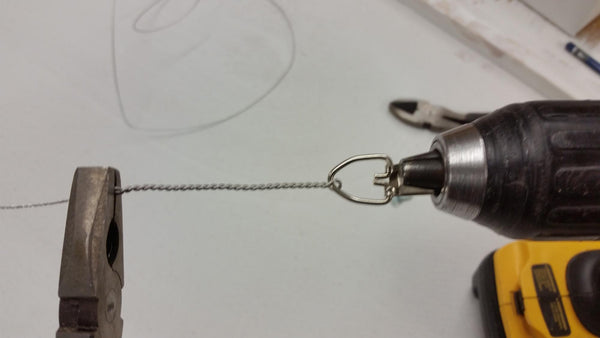
Screw that hanger into back or inside edge of frame. You can see on these pieces the hanger was attached to the inside edge of the frame. Attach the other hanger at the other mark.
Hold the wire at the top mark and then loop wire through 2nd With the wire stretched perfectly to the 3” mark, bend the wire at the hanger and continue to twist wire to secure. If wire tightens after twisting and falls below the 3” mark, gently pull on wire until it is exactly 3” from middle top. Consistency and accuracy on this part ensure easier leveling and alignment during installation of the paintings. Complete on all 6 panels. They are now ready for Paint!


Painting Process Details:
-
Determine Subject (2 hours)
For this project, the client picked out paintings from my website that they liked, and gave me considerable freedom to reinterpret the theme on a larger scale. In other situations, it is not uncommon for me to provide multiple photos, paintings, or sketches in an attempt to find what the client is looking for. Sometimes this goes really smoothly, other times it drags out.
These are the two images from my website the client selected for me to work from.

My advice for anyone looking to commission an artist is this:
- have a very clear idea of the subject and style of painting you want
- make sure this style and subject align with your chosen artist’s style and typical subject matter
- have 2 or 3 photos ready for the artist to work from, have 1 favorite
- pick 2 or 3 paintings by that artist that you absolutely love and identify why you like them in terms of painting style, subject, colors, feelings…etc
- Left Go: be comfortable with giving the artist freedom to impress their vision on your project – letting the artist “do their thing” will ultimately produce a much better piece of art.
-
Planning: Simplify into 3 Values, Warm and Cool Colors (2 hours)
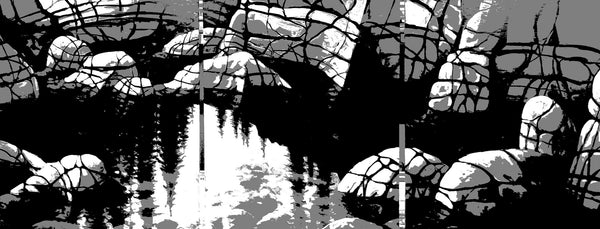
Think of your subject in terms of value. Value is the relative lightness and darkness of a color. It is common for artists to think in terms of 3 values: light value, middle value, and dark value. Many will often go through the process of doing a value study of their painting – this means a small black and white painting or sketch of their subject simplified into 3 values: light, middle, dark. I did not do that for these paintings since I already painted them, but I did create a black and white image posterized image in photoshop that reveals the same concept.

I also make a mental note, and will sometimes even go as far as making a color sketch, that identifies whether shapes are warm, cool, or neutral. It often helps to have a dominance of one, with an accent of the other.
-
Apply Undercoating (2 hours)
Undercoatings are typically bold colored washes that “tone” the panel or canvas. You might wonder: why do this if it will get covered up anyway? Well, if used strategically, the painting will not cover it up completely, but rather let little pieces of that undercolor sparkle through in the end. This has a tendency to unify the painting through color harmony and create brilliant sparkles of light. Ask yourself what the accent color in the painting will be, and use something similar for the undercoating. I use Golden Fluid acrylics because they are already in liquid form but are super concentrated so the pigment stays strong, even in these large wet into wet washes.

I laid these flat to dry so they wouldn't run anymore.
The same approach was used for the other triptych:
-
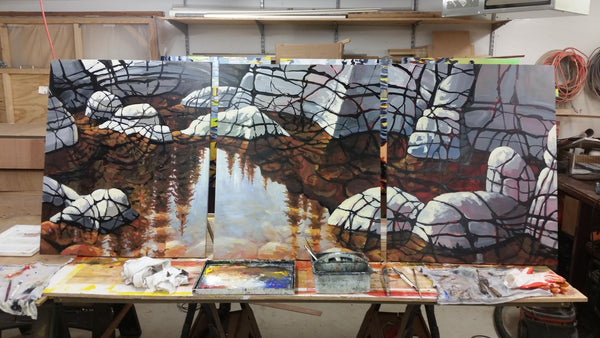
Sketch & Block in Large Shapes (8 hours)
Using a long round bristle brush and a watered down mixture of Burnt Sienna, I loosely sketch in the larges shapes in the painting. These subjects are completely organic, so they don’t demand a lot of accuracy up front. Still, it’s nice to keep proportions and angles somewhat close to the original compositions so I can stay on a successful and familiar path.

For blocking in, I will often block in the largest and easiest value or color shapes that I can identify. In the rocks painting, you can see the larges and easiest shape to paint in was the darker, warmer reflection in the water.
Next, I blocked in the large blue sky reflection.
Continuing to block-in large shapes of value and color...

In the lily pad painting, the sketch was fun because it was very free-form.
The blue negative space of the water was the easiest, largest, simplest shape to paint.
-
Darks (4 hours)
Undercoatings tend to dry to middle value or light middle values. The block –in tends to be darker middle values and darks. Darks anchor and define a composition. If not established during the block-in, I like to put the darks in next.
In the Lily pads painting, the stylized water rhythms were too much for me, so I eliminated the by re-doing the blue block-in with simple shades of blue, and then went over the top of the with dark vertical reflections of trees.
In the rocks painting, this includes the cracks and the underwater shadows.
-
Lights (4 hours)
Light values often serve as the highlights and visually jump out toward the viewer. This dramatic effect is often the reason they go in last and with careful consideration in this “undercoating” approach. In the rocks painting, the lights were mainly highlights on the rocks themselves.
-
Refine (10 hours)
Details, color temperature shifts, glazing, color accents, finishing touches, “tightening things up”. Bringing the entire painting into focus. Finishing up. In a medium like acrylic or oil, it can be challenging to know when the painting is finished. I once heard an artist describe this moment as the time when “the painting stops annoying you”. One weekend, after reworking a painting multiple times, my wife mentioned “you know- you aren’t making the thing any better or worse, you’re just making it different”. She was right, and I remember that often because it helps me focus on what my original intent was.
Details in this piece included stems, little highlights, and glazing over the pads to dull the color.
-
Finish: Isolation Coating & Removable Varnish Coating (2 hours)
Once the paintings are thoroughly dry, create a “safety barrier” in-between the painting and the varnish coat by applying 2 isolation coats. The isolation coat consists of a 2 parts Golden Soft Gel Gloss to one part water. Brush it on in one direction for the first coat, and then the opposite direction for the second coat. It’s best to wait 24 hours between coats.
The final coating is a Varnish; the specific product is Golden UVLS Satin Varnish. I dilute it a little bit with water, not much – maybe 3 parts varnish to one part water, and brush it on liberally and evenly. The UVLS varnish is a product that is removable. Why would you want a removable varnish? Well, imagine that in 100 years your beautiful painting has collected a lot of dust, dirt, and tarnish on the surface of the painting. By having a top coat that is removable, a conservator can take off the dirty varnish and reapply a new coating – making the painting look brand new. The reason the actual paint is not disturbed during this process is due to the isolation coat; the “safety barrier” in-between the actual painting and the removable varnish coating.


So that’s it – the entire process from beginning to end. It’s a lot of work to be an artist – but its well worth it! Again this is not a "definitive" best practice, but rather one method to making an acrylic painting. Please feel free to post any comments, suggestions, or questions you have and THANK YOU for following along!

-
Dan Mondloch